MySQLi Recordset
In order to get started adding a Recordset to your document, you must first have a connection defined within your current site in Dreamweaver. Once your Connection is created, access the MySQLi Server Behavior's Recordset at: Server Behaviors > + > WebAssist > MySQLi > MySQLi Recordset.
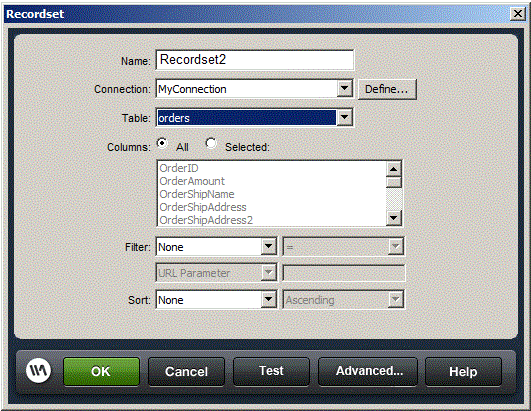
Options for the simple Recordset dialog box
-
In the Name box, enter a name for the recordset.
A common practice is to add the prefix rs to recordset names to distinguish them from other object names in the code, for example: rsProducts.
Recordset names can only contain letters, numbers, and the underscore character (_). You cannot use special characters or spaces.
-
Select a connection from the Connection pop‑up menu.
If no connection appears in the list, click Define to create one.
-
In the Table pop‑up menu, select the database table that will provide data to the recordset.
The pop‑up menu displays all tables in the specified database.
-
To include a subset of the table’s columns in the recordset, click Selected and choose the desired columns by Control-clicking (Windows) or Command-clicking (Macintosh) them in the list.
-
To further limit the records returned from the table, complete the Filter section:
-
From the first pop‑up menu, select a column in the database table to compare against a test value you define.
-
From the second pop‑up menu, select a conditional expression to compare the selected value in each record against the test value.
-
From the third pop‑up menu, select Entered Value.
-
In the box, enter the test value.
If the specified value in a record meets your filtering condition, the record is included the recordset.
-
-
(Optional) To sort the records, select a column to sort by, and then specify whether the records should be sorted in ascending order (1, 2, 3... or A, B, C...) or descending order.
-
Click Test to connect to the database and create an instance of the data source, and click OK to close the data source.
A table appears displaying the returned data. Each row contains a record and each column represents a field in that record.
-
Click OK. The newly defined recordset appears in the Bindings panel.
Options for the advanced Recordset dialog box
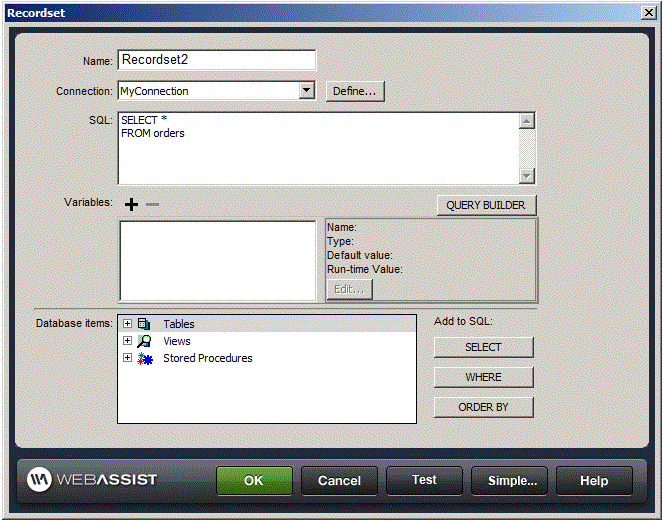
Define a recordset as a source of dynamic content by writing a custom SQL statement, or by creating a SQL statement using the Query Builder interface..
- In the Name box, enter a name for the recordset.
A common practice is to add the prefix rs to recordset names to distinguish them from other object names in the code. For example: rsPressRelease
Recordset names can only contain letters, numbers, and the underscore character (_). You cannot use special characters or spaces.
- Select a connection from the Connection pop‑up menu.
- Enter a SQL statement in the SQL text area or use the graphical Database Items tree at the bottom of the dialog box to build a SQL statement from the chosen recordset.
Do the following to use the Database Items tree to build the SQL statement:
-
Ensure the SQL text area is blank.
-
Expand the branches of the tree until you find the database object you need—a column in a table, for example, or a stored procedure in the database.
-
Select the database object and click one of the buttons on the right side of the tree.
For example, if you select a table column, the available buttons are SELECT, WHERE, and ORDER BY. Click one of the buttons to add the associated clause to your SQL statement.
You can also use a predefined SQL statement in a stored procedure by selecting the stored procedure from the Database Items tree and clicking the Procedure button. Dreamweaver automatically fills in the SQL and Variable areas.
-
- If the SQL statement contains variables, define their values in the Variables area by clicking the Plus (+) button and entering the variable’s name, type (integer, text, date, or floating point number), default value (the value the variable should take if no run-time value is returned), and run-time value.
Note: When using variables in a SQL statement in PHP, Dreamweaver automatically adds a leading dollar sign to the variable name, so you should omit the dollar sign (e.g., colname, instead of $colname).
If the SQL statement contains variables, make sure the Default Value column of the Variables box contains valid test values.
The run-time value is usually a URL or form parameter entered by a user in an HTML form field.
URL parameters in the Run-time Value column:
PHP
$_GET['formFieldName']
Form parameters in the Run-time Value column:
PHP
$_POST['formFieldName']
- Click Test to connect to the database and create an instance of the recordset.
If the SQL statement contains variables, make sure the Default Value column of the Variables box contains valid test values before clicking Test.
If successful, a table appears displaying the data in your recordset. Each row contains a record and each column represents a field in that record. Click OK to clear the recordset.
- If satisfied with your work, click OK. Additionally, the Query Builder button will launch the Query Builder interface for graphical assistance in forming your SQL statement.
Define parameters in a SQL statement
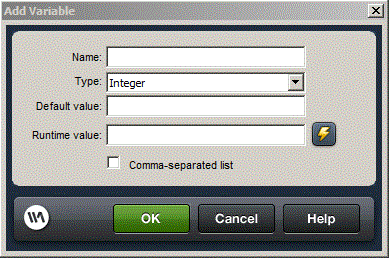
Define parameters in a SQL statement; the default value is the value that the parameter should use if no run-time value is returned.
- Enter a parameter name in the Name box.
- Select a parameter type.
- Enter a default value for the parameter in the Default Parameter box.
- Enter a run-time value for a parameter in the Run-time Value box, and click OK.
- If your run-time value is originating from an array, select the Comma-separated list checkbox.