Adding Validation to Captcha
To validate your Captcha graphic, you will use the Like Entry option that makes sure that what is entered into the text field matches the characters in the Captcha graphic.
The Like Entry validation checks the contents of a specified server variable to determine if the value it contains is the same as another specified server variable. It can also be configured to accept blank entries.
Adding the Validation
Follow these steps after inserting Captcha to your form, to add validation to the field.
- From the WebAssist menu, choose Forms > Validation > Server Validation.
- In the Server Validations window, choose the desired Validation trigger.
Any Form Post will work in most cases.
- From the Validation type menu, choose Like Entry.
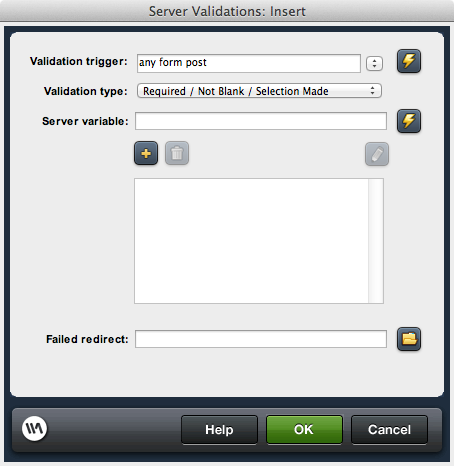
- Select the Server variable lightning bolt.
- Expand the Session option and choose the captcha_Security_Code entry.
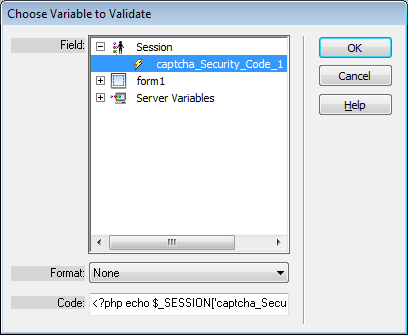
- Click OK.
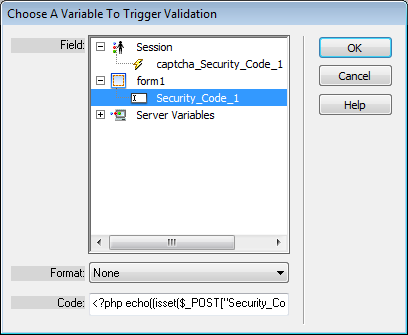
- Click the Add (+) option to specify the element being validated.
- In the Like Entry dialog, click the Same as lightning bolt

- Choose the Security_Code text field and click OK.
- In the Failed redirect field, choose the page that you wish to navigate to if the code is entered incorrectly.
If you intend to use a Validation Show If behavior to display an error message next to the form, you will want to choose the current page. - Click OK to apply the validation to the page.
Applying the Validation Show If Behavior
Now that you have applied the Server Validation to check that the Code was entered correctly, you might want to display an error message on your page that lets the user know what the problem is. A validation show if behavior can be applied to show content, or enable code, when a validation fails or passes.
- Type the error message you wish to appear when the Captcha code is entered incorrectly on your page.
In most cases, you will want this error to be directly beside or beneath the Security Code text field. - Highlight the error message you have typed.
- From the WebAssist menu, choose Forms > Validation > Validation Show If.
- From the Validation page field, select the current page.
When applying a Show If behavior, you always choose the page that you have added the Server Validation to. - From the Validations fail menu, choose the Like Entry validation you applied for the Captcha and click the + button.
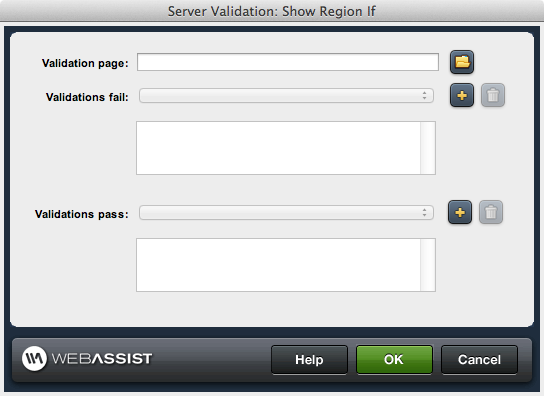
- When you are finished click OK.
This behavior can also be used to display different CSS styles when validation fails. Simply apply the Show If behavior to a particular class reference that should be enabled only when validation failed. For more information, see the tutorials on the Form Toolkit Support page.