Show/Hide Layer
The Show/Hide Layer behavior displays or hides a layer on the page if a specified form element passes validation. It is typically used for customized error messages but can also be used to display additional forms and form elements based on a validation.
For this behavior to work appropriately, it must be applied to an event that occurs after the event(s) that the validation behavior checking the trigger form element is applied to. Further, if this behavior is applied to an event for a page element which is also the form element it is checking validations for, it must come after each validation behavior pertinent to the script in the order of behaviors for that page element.
Note: The order of behaviors and their corresponding events is represented in the Behaviors panel by the order they are listed. You can use the Up and Down arrows to change the order of a selected behavior within this panel.
To apply the Show/Hide Layer behavior to an element on the page:
- In Design View, select the form element or tag whose event triggers the behavior.
- In the Behaviors panel, click the Plus (+) button and then select WA Validation Toolkit > Apply Client Validations > Show/Hide Layer.
The Show/Hide Layer dialog opens:
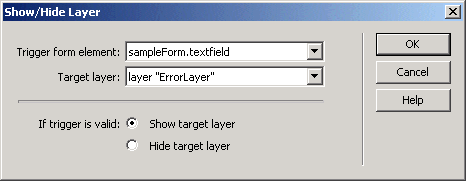
To configure the Show/Hide Layer behavior:
- Select the form element to be checked by the validation from the list of available form elements. The following form element types are available for validation:
- File Field
- Hidden Field
- Text Field
- Textarea
- Select the layer that is to be shown/hidden dependent on if the validation passes for the selected form element.
- Select whether the layer is to be shown or hidden if the validation passes.
- Click OK to apply the behavior to the page.
- Within the behavior panel, select the applied Show/Hide Layer behavior.
- Ensure the event selected reflects the appropriate trigger for the page element to which you have applied the Show/Hide Layer behavior.